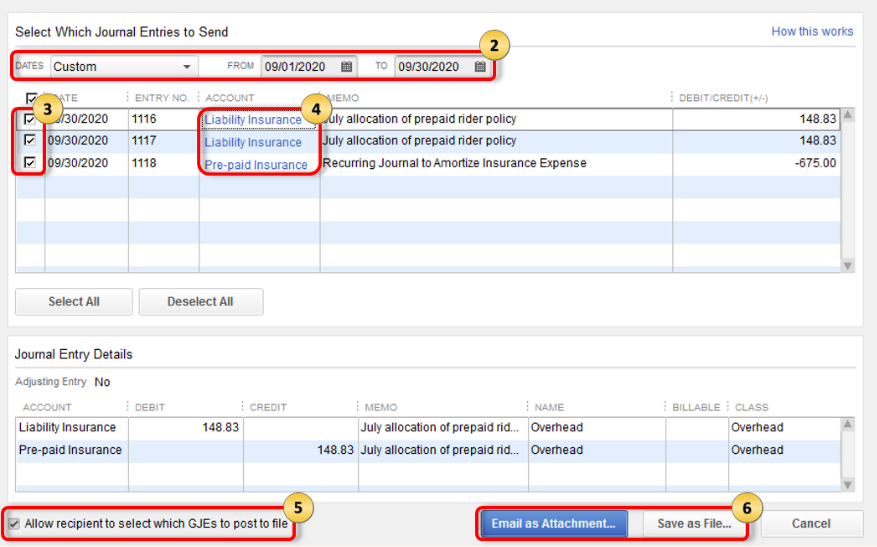
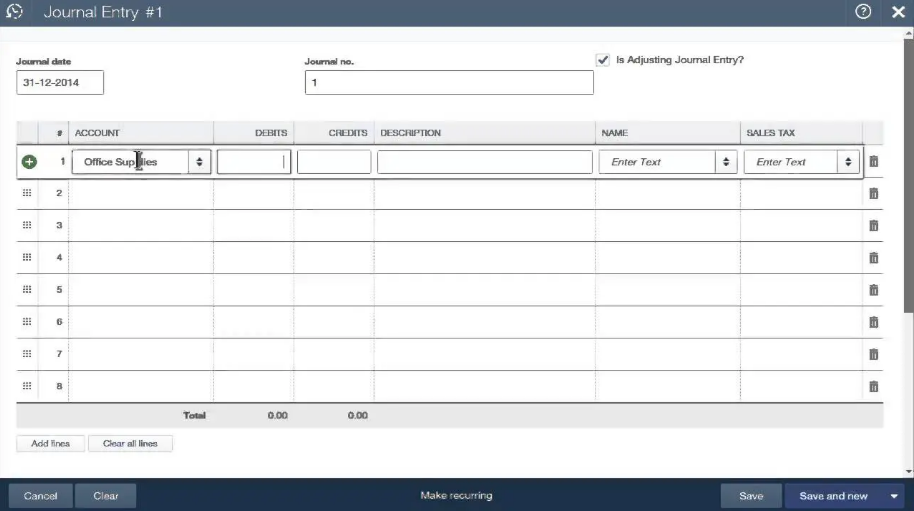
QuickBooks is mainly known for handling accounts of business organizations/enterprises. It was designed to manage your business accounts. Keeping a record of every transaction is essential for the book to be systematic, and journal entries in QuickBooks help you with the same. It keeps all your crucial records like credit or debit, amount date, etc. However, when the data begin to expand via journal entry, it becomes a challenging task. In order to make your task easy, follow the article till the end.
Highlighted Points:
- What do you mean by journal entry?
- When to use Journal Entry in QuickBooks?
- Points to remember before creating journal entries in QuickBooks
- Basic steps for creating journal entry in QuickBooks
- Edit a journal entry
- Delete the journal entry
- Reverse a journal entry
- What are the ways to view all journal entries in QuickBooks?
- How to view old journal entries in QuickBooks?
- FAQ (Frequently Asked Question)
What do you mean by journal entries in QuickBooks?
A journal entry records every business transaction for organizations/enterprises in the accounting system. An appropriate journal entry includes the proper date, amounts to be credited or debited, transaction description, and also a unique reference number.
In any accounting cycle, the journal entry is considered to be the first step. A journal contains every financial transaction of your business and informs you about all accounts affected. Generally, most business organizations use double-entry accounting, which needs transactions to be recorded in at least more than one account, where one account is credited and another one is debited.
Then there is a General Journal Entry in which accounting transaction is entered or posted straight to the general ledger. A company’s general ledger is the main group of the account used mainly for recording balance sheet and income statement transactions.
When to use Journal Entry in QuickBooks?
There is a specific time to use journal entry in QuickBooks, so mentioned below are some suggested advice for when to use journal entry in QB online:
- When entering debits & credits in a general journal or the ledger.
- When sending the money between income & expense accounts.
- Lastly, when transferring money from liability, equity, and an asset.
Points To Remember Before Creating Journal Entries in QuickBooks
- If you have created an entry and want to correct the transaction, then it can be completed by reversing or deleting the journal entry.
- The entry for the accounts receivable or accounts the payable account will need a customer or vendor.
- Always include one account as receivable and another as payable type account for every entry.
- It is suggested that you shouldn’t make journal entries to payroll accounts or inventory.
- It’s important to make sure that the entry includes a line for A/R or A/P, and also, don’t forget to include the vendor or customer’s name.
- QuickBooks Online does not have multi-currency in a single journal entry, which means all the currency will have their own journal entry.
- It is important to check the additional column for the class and location in case you are using QuickBooks Online.
Basic Steps For Creating Journal Entry in QuickBooks
Mentioned below are some ways to record a journal entry in QB.

STEP 1: The journal entries in QuickBooks feature
- To begin with, go to the journal entry feature.
- Now, hit on the plus icon at the top right of the file.
- Next, from the drop-down menu, click on create
- The create option will come with the journal entry option.
- In the end, you will be directed again to the window containing important information.
STEP 2: Inserting date & journal number
- Now, the form will open up on the screen.
- Modify the journal date (the current date will be inserted on its own by QuickBooks).
- In case you wish to record entry from any other date, then verify the date before proceeding.
- If you haven’t edited the date, the QB application will automatically insert the date accordingly.
STEP 3: Inserting the required information
- Accounts: It the accounts in the chart of accounts.
- Journal Code: The next most important thing to insert is the journal code. Ensure that you insert the same new journal code which is linked to the transaction for the debit & credit accounts.
- Debit & Credit: Verify whether the debit has been modified or not after the transaction got saved. Another thing is to look for the transaction in the current report and check whether the first line is in debit.
- Name: In this step, decide the customer, employee, or vendor.
Note: It is mandatory to match the distributed line of debit and credit. If it doesn’t match, then try to fill the distribution lined till the tallies’ total.
STEP 4: Choose to create a recurring journal entry schedule
- In this step, you need to choose the recurring journal entry schedule.
- Lastly, finish the task by clicking on save the transaction.
Edit a journal entry
After knowing the procedure of creating the journal entry, you would want to learn the technique to edit a journal entry in QB. Mentioned below are the steps you can follow:
- At first, go to the company menu and select the make general journal entries option from the drop-down menu.
- Now, click on the Find option and then insert the name, date, entry no, or amount.
- Move your cursor to the journal entry and double-tap on it and after that, make updates.
- Click on the option Save & close.
- To record the changes made, tap on the yes option.
Delete the journal entry
In case any error comes in any journal entry or any kind of mistake, then you can delete the journal entry by following the steps given below:
- From the company menu, select the make general journal option.
- Tap on the Find option; insert the name, date, entry no. etc.
- Now, select to find and then double-tap on the journal entry.
- Further, hit delete or void and press OK.
- Lastly, choose to save & close.
Reverse a journal entry
- Scroll down to the company menu, click on the make general journal entry option.
- After that, search for the journal entry you wish to reverse.
- Select the find, and insert name, date, entry number, or amount. Click on the Find tab.
- Click on reverse.
- At last, click on the save and close tab.
What are the ways to view list of journal entries in QuickBooks
- First of all, right-click on the QuickBooks, tap on reports from the option.
- Find out the journal from the text box.
- Go to the report period, hit on the month-to-date, and then select the custom from there.
- Change the reports in the way you need to date range.
- In the end, the report will get upgraded, and then you can view a list of journal entries in QuickBooks.
Simple ways to find journal entries in QuickBooks

QuickBooks Online contains an Advanced Search option that helps you in making your search for a transaction easy. Also, reconciling an account for errors is essential to verify each old journal entry in QuickBooks
- Initially, tap on the option Advanced Search.
- From the drop-down menu, choose journal entries.
- Finally, it’s all up to you whether you want to view all journal entries in QB or not.
What are the ways to view all journal entries in QuickBooks?
There are some methods through which you can know how to view journal entries in QuickBooks. Follow the steps mentioned below:
- At first, open QuickBooks.
- Then, from the left panel, select hit on reports.
- From the desktop, click on the search box and type journal.
- Now, go to the report period, click on the month-to-date, and select custom.
- Edit the starting & and the end of the date range (for which you see every journal entry in that period).
- Lastly, tap wherever you want to click on the page to upgrade your report.
How to view old journal entries in QuickBooks?
In case you are willing to know how to view old journal entries in QuickBooks, then follow the steps given below:
- Move your cursor to the top right corner and then click on create an icon.
- After that, click on the journal entry.
- Next, you can select the icon symbolized as a counter-clockwise arrow.
- Further, click on view more.
- At last, you can see the general journal entries in QB.
FAQ (Frequently Asked Question)
Question: Why can’t I save my journal entry?
Answer: Open it using a private browser, delete the cache and browsing history, and also, you can log in to the QB online account using a Private browser in incognito mode.
- Google Chrome: Ctrl + Shift + N
- Mozilla Firefox: Ctrl + Shift + P
- Safari: Ctrl + Option + P
Summary
We hope by reading this article creating journal entries in QuickBooks became easier. However, the users have always encountered cases of errors when trying to enter a transaction, which stops them to run journal reports in QuickBooks. Speak to a professional at toll-free number +1(800) 280-5969 about the same and clear the doubt.


1 comment
[…] After that, enter the ending balance and the statement date, ensure that you insert the same date which matches your journal entry. […]